Why You’ll Love this Pumpkin Blondies Recipe
Whether you’re a fan of pumpkin or just love a good dessert, you’ll adore this Pumpkin Blondies recipe. The moment I took my first bite, I was hooked!
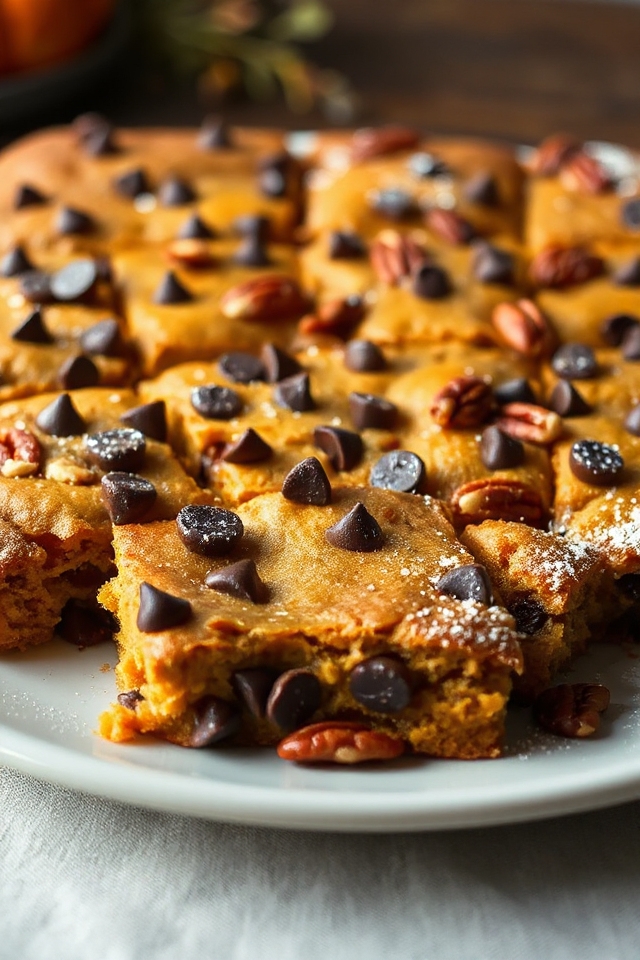
These blondies strike the perfect balance between rich, buttery goodness and the warm, cozy flavors of fall. The addition of chocolate chips and pecans adds delightful texture and sweetness, making each bite irresistible.
Plus, they’re easy to whip up, perfect for gatherings or simply indulging yourself. Whether enjoyed warm or at room temperature, these blondies are sure to become a new favorite.
Trust me, you’ll want to make them again and again!
Ingredients of Pumpkin Blondies
When it comes to baking, the ingredients you use can make all the difference, especially in a delightful treat like Pumpkin Blondies. This recipe calls for a handful of simple, yet essential ingredients that blend together to create a rich, flavorful dessert.
If you’ve got a craving for something cozy and sweet, you’re in the right place. Let’s plunge into and check out what you’ll need to gather from your pantry and fridge to whip up these delicious blondies.
Ingredients for Pumpkin Blondies:
- 2 1/3 cups all-purpose flour
- 1 tablespoon pumpkin pie spice
- 1 teaspoon cinnamon
- 1 teaspoon baking soda
- 3/4 teaspoon kosher salt
- 1 cup unsalted butter, room temperature
- 3/4 cup granulated sugar
- 3/4 cup dark brown sugar
- 1 large egg
- 2 teaspoons vanilla extract
- 1 (15 ounce) can pure pumpkin puree
- 2 cups dark chocolate chips
- 3/4 cup pecans, roughly chopped
Now, let’s chat about those ingredients for a moment. First off, using pure pumpkin puree is key; it gives that lovely, moist texture and a rich pumpkin flavor that you just can’t beat.
And don’t even think about skimping on the chocolate chips—two cups might sound like a lot, but trust me, they’re essential for that sweet, melty goodness.
If you’re not a fan of pecans, feel free to swap them for walnuts or even leave them out altogether. After all, it’s your kitchen, and you can make these blondies however you like.
Just remember, the magic happens when all these elements come together, so gather everything up and get ready to bake some happiness.
How to Make Pumpkin Blondies
Alright, let’s plunge into the delightful world of making Pumpkin Blondies. First off, you’ll want to preheat your oven to a cozy 350 degrees. This is the perfect temperature for baking and will have your kitchen smelling like autumn in no time.
Grab a 9-by-13-inch baking pan and line the bottom and sides with parchment paper, leaving a little overhang—this will help you lift those blondies out later without a wrestling match. Once that’s done, give the parchment a spritz of nonstick cooking spray. Trust me, you don’t want your precious blondies to stick.
Now, let’s get mixing. In a medium bowl, whisk together 2 1/3 cups of all-purpose flour, 1 tablespoon of pumpkin pie spice, 1 teaspoon of cinnamon, 1 teaspoon of baking soda, and 3/4 teaspoon of kosher salt. Set that aside for now.
Next, in the bowl of your stand mixer (or a regular bowl if you’re feeling adventurous and don’t mind a workout), cream together 1 cup of unsalted butter that’s nice and soft, along with 3/4 cup of granulated sugar and 3/4 cup of dark brown sugar. You want this mixture to be smooth and creamy—think of it as a fluffy cloud of sweetness.
Once that’s achieved, beat in 1 large egg and 2 teaspoons of vanilla extract until they’re combined, and then add in the star of the show: 1 (15 ounce) can of pure pumpkin puree. If it looks a bit curdled, don’t panic; it’ll all come together perfectly.
Now it’s time to bring it all together. Reduce the speed of your mixer to low and gradually mix in the dry ingredients until just combined—overmixing is a sneaky culprit that can lead to tough blondies, and we want them soft and chewy, right?
Once you’ve got a lovely batter, fold in 2 cups of dark chocolate chips and 3/4 cup of roughly chopped pecans. This is where the magic happens; the chocolate and nuts add texture and bursts of flavor that will make your taste buds dance.
Spread this delicious batter evenly into your prepared baking pan and pop it into the oven. Bake for about 25 to 30 minutes, or until a toothpick comes out with a few moist crumbs.
And just like that, you’re on your way to enjoying a warm, gooey treat that’s perfect for sharing—or not, no judgment here.
Pumpkin Blondies Substitutions & Variations
If you’re looking to customize your Pumpkin Blondies, there are plenty of delicious substitutions and variations to contemplate.
For a nut-free option, skip the pecans or replace them with sunflower seeds. You can swap in white chocolate chips for a sweeter twist or use butterscotch chips for a unique flavor.
If you want a healthier touch, try whole wheat flour or add oats for texture. For a dairy-free version, use coconut oil and dairy-free chocolate chips.
Finally, experiment with spices—adding a pinch of nutmeg or ginger can elevate your blondies to a whole new level of deliciousness! Enjoy your baking!
What to Serve with Pumpkin Blondies
While enjoying your Pumpkin Blondies, consider pairing them with a few delightful accompaniments to enhance the experience.
I love serving them warm with a scoop of vanilla ice cream; the creaminess perfectly complements the spiced flavors. A drizzle of caramel sauce adds a touch of sweetness that elevates each bite.
For a cozy touch, I sometimes brew a cup of spiced chai or coffee, which balances the richness of the blondies beautifully.
If you’re feeling adventurous, a dollop of whipped cream with a sprinkle of cinnamon can make them feel extra special.
Enjoy these tasty combinations!
Additional Tips & Notes
To guarantee your Pumpkin Blondies turn out perfectly every time, I’ve found a few tips that make a big difference.
First, make sure your butter is at room temperature; it helps achieve that creamy texture.
Next, don’t overmix the batter once you add the dry ingredients; just combine until you see no flour.
If you want extra flavor, try adding a pinch of nutmeg.
For a fudgier blondie, slightly underbake them; they’ll continue to set as they cool.
Finally, let them cool completely before cutting for clean edges.
Enjoy your delicious treats!